To follow along with this guide, Click here to open your free Simvoly trial account— no credit card required, 14-day free trial. —
Overview
This guide walks you through everything you need to start using Simvoly confidently:
- Creating your account and navigating the modern dashboard
- Building your first page with the smart drag-and-drop builder
- Connecting a custom domain with auto-SSL
- Setting up native payment gateways
- Launching your first high-converting sales funnel
Estimated time to complete: 30–45 minutes
Step 1: Create Your Account
- Go to Simvoly and Go to Simvoly and start your 14-day free trial here..
- Enter your name, email, and create a secure password.
- No credit card is required — you get full, unrestricted access to all core features, including the AI assistant, during the trial.
- Check your inbox for a confirmation email to verify your account.
Once logged in, you will see the main dashboard with your primary workspace tools on the left sidebar: Pages (Website/Funnels), Store, CRM (Contacts), E-mail & Automations, and Settings.
Step 2: Create Your First Website or Page
2.1 Start a New Project
- From the dashboard, click “+ New Website” or “+ New Funnel”.
- Choose a template — Simvoly offers hundreds of modern, mobile-responsive templates categorized by industry (Business, eCommerce, Lead Gen, Courses, Portfolios, etc.).
- Click “Select” on your chosen template.
- Name your project and click “Create”.
2.2 Mastering the Drag-and-Drop Builder
Inside the editor, the workspace is intuitively split:
- Left Toolbar: Add Blocks, Add Elements (Text, Images, Buttons, Forms, Videos, Checkout, etc.), Global Styling, and Page Tree.
- Center Canvas: Your live, visual page preview.
- Inline/Floating Menu: Appears when you click any element to control its specific settings, styling, or AI generation features.
To add a new section (Block):
- Hover between existing blocks and click the “+” (Add Block) button.
- Browse through hundreds of pre-designed block layouts (Call to Actions, Team, Testimonials, Headers) or select an empty block.
- Click to insert it, then use the handles to adjust padding/margins visually.
To edit elements:
- Click directly on any element (like a text heading or button).
- Edit text inline or use the popup styling menu to adjust fonts, colors, animations, and links.
- Use the Simvoly AI Assistant icon next to text elements to instantly rewrite, shorten, or translate your copy.
Responsive Design (Mobile & Tablet View):
- Click the device icons at the top or bottom toolbar to switch views.
- Simvoly generates mobile layouts automatically, but you can tweak spacing and font sizes specifically for mobile without breaking the desktop layout. You can also hide specific blocks on mobile/desktop for ultimate control.
💡 Pro Tip: Use Global Styling (the brush icon on the left) to set your brand colors and typography once. This ensures any new text or button you drop in automatically matches your brand identity.
Step 3: Connect a Custom Domain
By default, your project runs on a temporary Simvoly subdomain (e.g., yourbrand.simvoly.com). To connect your own domain:
3.1 Add Your Domain in Simvoly
- Navigate to Website/Funnel Settings (Gear icon) → Domains.
- Click “Connect an Existing Domain”.
- Enter your custom domain (e.g., yourdomain.com) and click “Connect”.
- Simvoly will instantly display the exact DNS records you need to map.
3.2 Update DNS at Your Domain Registrar
- Log in to where you bought your domain (Namecheap, GoDaddy, Cloudflare, etc.).
- Go to the DNS Management / Advanced DNS section.
- Add or update the following two records:
- A Record: Host/Name @ pointing to Simvoly’s current IP address (provided in your dashboard).
- CNAME Record: Host/Name www pointing to simvoly.com (or your specific routing target provided).
- Save your changes.
3.3 Verify and Wait for Propagation
DNS changes typically take anywhere from 15 minutes to 2 hours (up to 48 hours in rare cases) to propagate globally. Once live, Simvoly automatically provisions and renews a free SSL certificate (HTTPS) for your domain.
Step 4: Set Up Your Payment Gateways
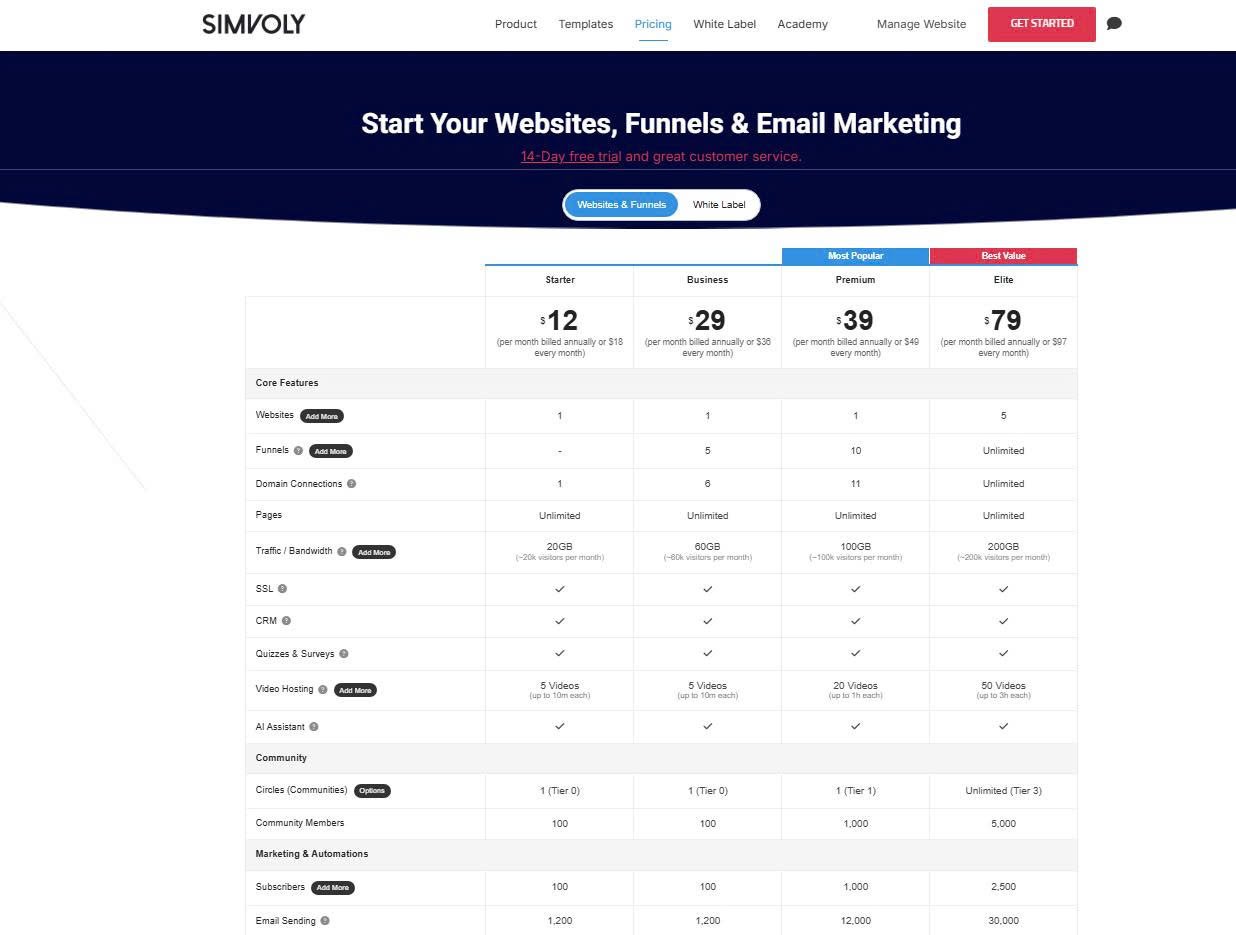
Simvoly supports native integrations with over 15+ payment gateways, charging 0% platform transaction fees on your sales.
4.1 Connect Stripe
- Go to Store from the top/left menu, then click Settings → Payments.
- Click “Add Payment Method” and select Stripe.
- Click “Connect” — you will be securely redirected to Stripe’s login portal.
- Grant permission to link your account, and you will be sent back to Simvoly. Stripe is now active!
4.2 Connect PayPal
- In the Payments tab, click “Add Payment Method” and choose PayPal.
- Enter your PayPal Business email address and select your API preferences.
- Follow the quick on-screen authorization to enable seamless PayPal Express checkouts.
4.3 Configure Currency, Localization & Taxes
- Navigate to Store → Settings → General.
- Define your store currency, weight units, and store info.
- Under Taxes, configure country or state-specific tax rates, and choose whether prices should include or exclude tax at checkout.
Step 5: Build Your First Sales Funnel
Funnels allow you to isolate the customer journey, eliminating distractions and maximizing average order value (AOV).
5.1 Create the Funnel
- Click the Funnels icon on the left menu.
- Click “Create a Funnel” and pick a goal-oriented layout (e.g., Lead Generation, Sales, Course/Membership, Webinar).
- Name it, and you’ll see your funnel mapping layout.
5.2 Optimize Your Funnel Steps
A standard sales funnel contains the following steps:
| Step | Page Type | Purpose |
| Step 1 | Landing Page / Sales Page | Captures attention, presents the main offer or video. |
| Step 2 | Checkout Page | Custom 1-page or 2-step checkout to collect payment information. |
| Step 3 | One-Click Upsell / Downsell | Offers a complementary product immediately after checkout with 1 click. |
| Step 4 | Thank You Page | Displays order details, confirmation, or digital download access. |
To modify or add steps, click “+ Add New Step” in your funnel workflow view and select your preferred page template.
5.3 Connect Products to Checkout
- Open your Checkout Page in the builder.
- Click on the Checkout element/widget on the page to open its settings.
- Under the Product tab, click “Select Product”.
- Choose an existing physical, digital, membership, or service product from your store, or quickly create a new one right there.
- (Optional) Turn on the “Bump Offer” toggle to add a high-converting checkbox offer right on the checkout form.
5.4 Setting Up A/B Split Testing
- In your Funnel steps sidebar, click the “A/B Test” option next to any page step.
- Click “Duplicate Page” or start with a blank variation.
- Tweak one main variable on Variant B (e.g., a bolder headline, a different hero image, or a new video).
- Simvoly automatically distributes incoming traffic 50/50 and tracks which variant wins more conversions.
Step 6: Connect Email Marketing & Automations
Simvoly features a fully integrated Email Marketing and CRM engine, meaning you don’t need third-party autoresponders.
- Go to E-mail & Automations from the main dashboard.
- Click Automations on the left menu, then select “Create Automation”.
- Choose a Trigger (e.g., Tag is added, Form submitted, Product purchased, or Abandoned Cart).
- Click the “+” sign in your workflow canvas to add actions:
- Send Email: Design responsive emails using the drag-and-drop newsletter builder.
- Delay: Wait X hours/days before sending the next follow-up.
- Add/Remove Tags: Segregate your CRM lists based on buying behavior.
- Switch the toggle from Draft to Active.
Step 7: Third-Party Integrations
If you still rely on outside platforms, Simvoly hooks into external ecosystems seamlessly via Settings → Integrations:
- Native Email Sync: ActiveCampaign, Mailchimp, GetResponse, MailerLite, ConvertKit, etc.
- Tracking Pixels: Paste your Meta (Facebook) Pixel, Google Analytics 4 (GA4) measurement ID, and TikTok Pixel directly into dedicated fields.
- Webhooks, Zapier & Make: Connect Simvoly to thousands of external apps like Slack, Google Sheets, or custom CRMs effortlessly.
Quick Troubleshooting
| Issue | Quick Fix |
| Domain shows “Not Connected” | Ensure you have removed any conflicting old A/CNAME records in your registrar. Keep in mind that global DNS propagation can take a few hours. |
| Checkout payments failing | Make sure your payment gateway is not in “Test Mode/Sandbox” if you are trying to take real cards. Also, check that your store currency matches your gateway’s supported currencies. |
| Elements look misplaced on mobile | Open Mobile View in the builder. Adjust the margins/paddings or utilize mobile-specific text sizing. Avoid dragging elements too far outside the grid layout. |
Summary
Congratulations! You have successfully mastered the fundamentals of Simvoly. You now know how to:
- ✅ Spin up websites and customize layouts using the drag-and-drop editor.
- ✅ Wire up a secure custom domain.
- ✅ Link trusted processors like Stripe and PayPal.
- ✅ Build automated multi-step sales funnels with built-in A/B testing.
- ✅ Launch behavioral email automation sequences.
The absolute best way to master Simvoly is through hands-on practice. Dive into the interface, pick a template, and start building!
🚀 Ready to launch your business? Click here to create your free Simvoly trial account now — no credit card required.— no credit card required.
Disclosure: This post contains affiliate links. If you sign up and upgrade through my link, I may earn a small commission at no additional cost to you.